Client Portal
PRESENTER
Delight your customers and minimize admin busywork when you give your clients a real-time window to their own event. Your eSpeakers Client Portal lets customers see basic event details, travel plans, and event-related contacts. If you allow the client to make updates, those updates go directly into your event management application (EventCX) and you're notified instantly of exactly what was changed.
You may also have pre-event questions for your customer that don't have a matching field in EventCX ("What are your meeting goals?", "What has your organization been struggling with?", etc). The Client Portal integrates with Google Forms™ to collect answers from your client and store them as an attached .pdf document in the LIBRARY tab.
The Client Portal is a feature of the PRO account level.
Need to upgrade
?
Features include:
-
Give clients realtime access to the data you choose
-
Control what parts of the event clients can see
-
Make fields read-only, or allow the client to update some fields themselves (you can even make fields editable _until_ you have a signed contract, and then automatically lock them down after that)
-
Any changes made by clients are tracked and reported to you instantly
-
Allow clients to see basic event details, travel, contacts, EventCX custom fields
-
A "What else should we know?" area for any other questions your client may have about their event
-
A "Materials" link going to the files area of your eSpeakers profile where the client can get photos, handouts, room layouts, etc -- anything you've posted as an attached file on your profile
Answers to Some Frequently Asked Questions
-
The Client Portal feature is included in your eSpeakers PRO account (
need to upgrade
?).
-
You control exactly what your clients can see. For each available field, you control whether it is shown at all, and whether it can be changed by the client.
-
If you allow the client to make changes, how do you know what they changed? Three ways:
-
the new data is stored directly in the EventCX event
-
any change a client makes to their event is recorded in the event notes
-
you're immediately emailed when a change has been made
-
How is the event information secured? Two layers: each event has a unique URL with a special key embedded in the address, and the client is also required to enter their email address: only addresses that match one of the contacts on the event will be granted access.
-
What if I have a bureau customer who wants to give access to the client? No problem. Make sure the bureau rep is listed as a contact on the event, and also make sure you show and allow updates to the event contacts. Have the bureau rep add their client as a contact and then pass along the unique Client Portal URL for that event to their client. Since the client is now a contact on the event, their email address will give them access.
-
This seems to overlap some of the Online Assistant features? The roadmap for the Client Portal calls for it to gain the calendar check and questionnaire features. Once that happens, it will become the new Online Assistant.
How Do I Give Client Portal Access to My Customer?

Make sure the client is listed as a contact on the event, along with their correct email address. Then give them the event's unique URL to put in their web browser.
-
In
EventCX
, select an event and switch to the CONTACTS tab.
-
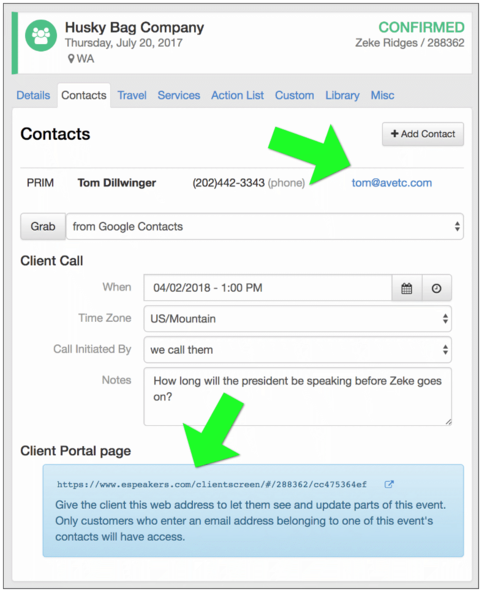
On the CONTACTS tab, make sure the client is listed as a contact, along with their correct email address. ADD CONTACT or GRAB a new contact if needed.
-
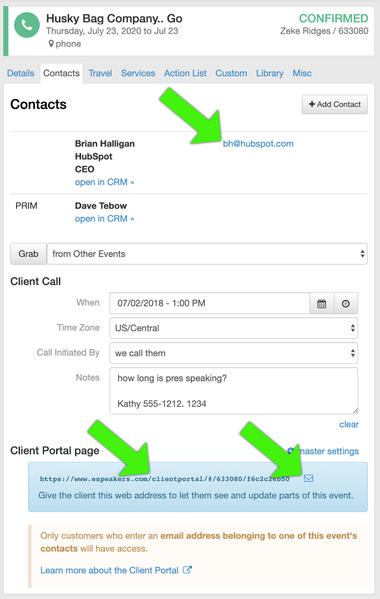
On the CONTACTS tab, find the CLIENT PORTAL section and note the unique URL. Each of your events has a special distinct URL that you give the client to open in their web browser.
-
Select and COPY the unique URL to paste into an email to the client. As a shortcut, clicking on the icon to the right of the link will automatically open your email program with the link in the email body.
How is My Data Secured?

The eSpeakers Client Portal gives you a way to share just the data you want with only the people you want to share it with.
Each event has a unique Client Portal web address (URL) that you'll share with your customer. The URL is formed in a way would make it difficult for a random person to guess it.
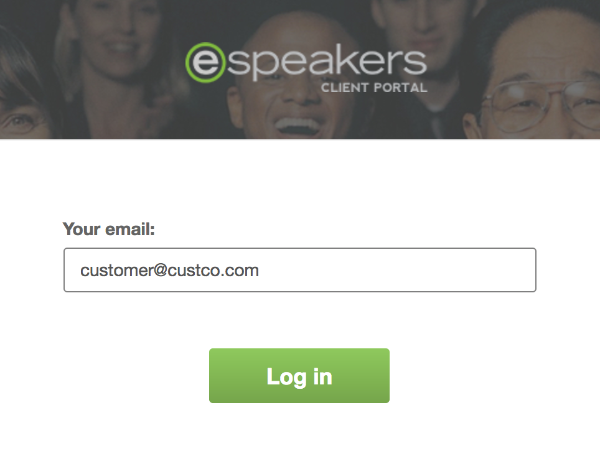
Once a visitor arrives at the Client Portal for a specific event, they are required to enter their email address. To gain access, the email address must exactly match one of the contacts listed on the event in EventCX.
How Do I Set the "Contact Us" Link Shown on the Client Portal?
When a visitor views your Client Portal, there is a link in the upper right-hand corner labeled "contact us" which should link back to your website and give the visitor your contact information.
Note that there is also a Materials link listed as a menu item on the left side that always links to the "files" sections of your eSpeakers profile.
To set or change where the "contact us" link goes:
-
In EventCX, find the account menu (your username in the upper-right corner) and choose
SETTINGS
-
On the SETTINGS screen choose the CLIENT PORTAL tab
-
If you are signed in with access to more than one speaker, use the FOR SPEAKER dropdown to select the speaker for whom you want to make changes. Each speaker has their own settings that will apply to their events.
-
Enter full URLs into the spaces provided. The URL should start with https:// or http://. Secure links (that start with https://) are better if available.
What Parts of the Event Data Are Seen by My Clients?
The Client Portal makes about 30 of EventCX's fields available; you choose which the client can see.
On the Client Portal screen that your customer sees, the fields are divided into tabs, similarly to the way they are divided in EventCX. The tabs and fields available are:
-
General
-
audience size
-
venue (room, building, city, state, country, address, zip)
-
appropriate dress
-
event date
-
time on stage
-
a/v check time
-
presentation title
-
Contacts (
for each contact listed on the event
)
-
name
-
title
-
company
-
phone
-
email
-
mobile
-
Travel plans
-
flight arrival and departure
-
hotel location, check-in and check-out date
-
ground transportation
-
Miscellaneous
-
10 "short" custom fields
-
8 "long" custom fields
-
What else should we know?
-
A type-in box allowing them to send a message asking a question not related to a specific field in EventCX
How Do I Choose Which Fields My Customers Can See or Change?
It's very useful to share some of the data you keep in EventCX with your customers. Of the 30+ EventCX fields that may be shown to the client in the Client Portal, you choose individually which to show to your customer, and of the ones you choose to show, you control which can be updated by the client.
You can show/hide complete tabs (General, Contacts, Travel Plans, Miscellaneous, What else show we know?), and individual fields within those tabs.
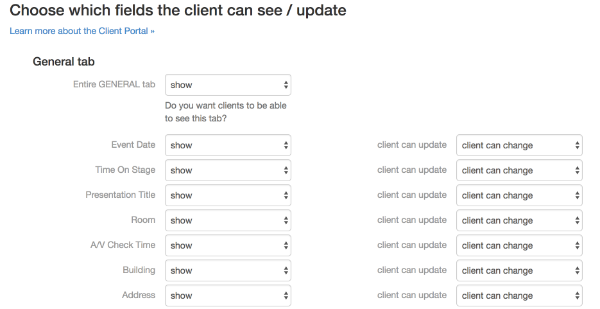
Control what fields are visible or editable by your client on the Client Portal settings screen:

-
In EventCX, find the account menu (your username in the upper-right corner) and choose
SETTINGS
-
On the SETTINGS screen choose the CLIENT PORTAL tab
-
If you are signed in with access to more than one speaker, use the FOR SPEAKER dropdown to select the speaker for whom you want to make changes. Each speaker has their own settings that will apply to their events.
-
Find the FIELD VISIBILITY section, and see the list of available tabs and fields.
-
Completely SHOW or HIDE an entire tab.
-
For example, if you do not want your clients to see the list of contacts on the event, you can hide the entire tab.
-
The tabs referred to are the left-side tabs in the Client Portal, not the event detail tabs in EventCX.Find the tab you want, set the SHOW control to HIDE
-
Click the SAVE button below to make your changes effective.
-
SHOW or HIDE individual fields on a Client Portal tab.
-
Find the field(s) you're interested in
-
Set the visibility setting to SHOW or HIDE
-
Set the editability setting to:
-
CLIENT CANNOT CHANGE - the customer will never be able to change this field
-
CLIENT CAN CHANGE - the customer will be able to change this field
-
WHEN OFFER PENDING IS ON - the customer will be able to change this field if the OFFER PENDING checkbox is ON. If the OFFER PENDING checkbox is OFF, the client will not be able to make changes to the field. Use this when you want the client to be able to make updates while you're in negotiations ("offer pending"), but once the contract is signed (uncheck "offer pending") you do not want them to be able to make changes to that field.
How Do I Use the Pre-Event Questionnaire Feature of the Client Portal?
The Client Portal can collect -- directly from your customer -- much of the data that matches up with a field in EventCX, including any of your custom fields. But there may be data you'd like to collect that doesn't fit into any of the fields in EventCX. In that case, a pre-event questionnaire is a good way to collect that extra information.
Questionnaires are powered by an integration with Google Forms™, which you can use with a
free Google account
.
When you add a questionnaire, your client portal will start showing a new Questionnaire tab to your customers where they see a link to the questionnaire, along with a unique code for them to enter into the questionnaire. The code ties their answers in the questionnaire back to their event.
When a client completes the questionnaire, the results are compiled into a pdf file that is attached to the document library tab of the event in EventCX. An email notification also goes out so that you'll know when the questionnaire has been completed.
How Do I Get My Customer to Fill Out the Pre-Event Questionnaire?

The pre-event questionnaire, linked to your Client Portal, is a great way to collect information that doesn't already have a dedicated field in EventCX.
To get your customer to fill out your questionnaire:
-
Send your customer an email that includes a link to their event's Portal page.
-
The easiest way to email the link to your customer is to bring up their event in EventCX, navigate to the CONTACTS tab, find the CLIENT PORTAL PAGE section near the bottom, and click the envelope icon, which will open your default email program with the link already in the email body.
-
You can also select and copy the Client Portal link, which is unique to each event, by highlighting it on the CONTACTS tab, right-clicking to choose COPY, and then PASTE the link into an email you write to your client.
-
Be sure the client's email address is correct on one of the CONTACTS on the event. Their email address is their access key once they reach the Client Portal.
-
In the email, instruct your customer to use the QUESTIONNAIRE tab along the left hand side of their screen after their sign in with their email address.
When the customer completes the questionnaire, you'll receive an immediate email. The results of the questionnaire will be attached directly to the event in the LIBRARY tab as a .pdf file.
Note: Do not send your customer the direct link to the questionnaire at Google. Going through the Client Portal is what links their questionnaire answers to the event in EventCX.
Related Articles
Pre-Event Questionnaire in the Client Portal
The Client Portal can directly collect from your customer most of the data that matches up with a field in EventCX, including any of your ``custom fields``. But there may be data you'd like to collect that doesn't fit into any of the fields of ...Manage Event Contacts in EventCX
PRESENTERS It is common for each event on your EventCX booking calendar to have several contacts tied to it: The primary booking contact A/V contact On-site contact Bureau rep Etc. Add a Contact to an Event Start with EventCX on your screen and the ...Marketing Boosts
eSpeakers provides marketing tools that are unique to the speaking industry. Many of our specialized systems leverage your speaking schedule: we like to help presenters multiply their business by using every engagement as a way to get more ...Get Great Return on Your eSpeakers Investment
eSpeakers is proud of the way we help speakers, trainers and coaches to grow a sustainable, long-term business with a great quality of life. Your investment every month or year in eSpeakers will pay dividends when you use the tools. Like any tool, ...60-Day-Success-Program
eSpeakers 60-Day Success Program You have decided to level up your speaking, training, or coaching business with eSpeakers, and we want to help you get the most out of your investment. Enroll for the course → (1 seat included with every PRO account) ...